I made a large ironing board!
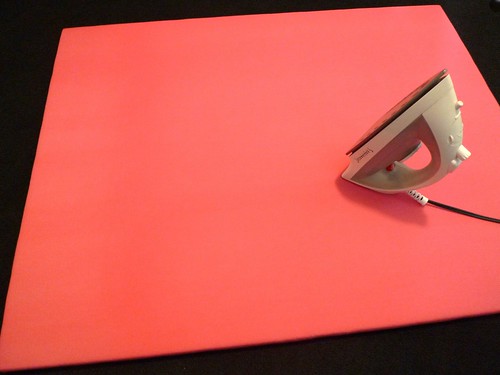
Pressing fabric on a standard ironing board seems to take forever; it seems most of my time is spent moving the fabric instead of actually ironing. I made a large ironing board (28" x 36") that will make pressing fabric much faster and easier!
This ironing board was made out of a piece of fiberboard I had on hand (my former craft table top), some heat-reflective batting, fabric, and some paint. First I cut my board to size then painted the back. After the paint dried, I covered the front with the heat-reflective batting, stapled it down, and cut of the excess. Next, I covered the front with fabric and stapled it down. I cut off some of the excess fabric, but left enough to fold back and cover the staples. Then I used fabric glue to secure those folds.
The back of the ironing board a bit 'artsy' because I ran out of the light blue paint I had mixed and didn't have anymore white to make more so I took the blue and made it swirly and cloud like. It is a little bit silly, but I had fun while painting it.
top bar
Apr 26, 2012
Apr 24, 2012
Dust Covers
This project was a really quick one. As part of my craft room makeover I made garment dust covers out of pillowcases.
All I really did was snip holes in the pillowcases and do some pretty embroidery stitches around the openings. Super easy! I am using pants hangers to store large cuttings of fabric and needed something to protect the fabric from dust; these pillowcase dust covers will do a great job!
Labels:
embroidery
Apr 19, 2012
Knit Creature
Last week I had a wild hare, I decided that I needed to knit something so I pulled out this rainbow yarn and got working on this:
I am not sure what this thing is going to look like when finished, but I think it needs googly eyes.
Labels:
knitting
Apr 17, 2012
Quilted Play Mat
Quite a while ago I bookmarked this cute quilted play mat from The Purl Bee. When looking for something to make my soon-to-be-born cousin I came across it and decided that I would make her something like it.
I went through my fat quarters selection and decided that two pinkish florals and two yellowish florals were "the ones". The back of the play mat is blue floral fabric which coordinates nicely.
Instead of stitching designs into the play mat I top stitched around the edges and tied embroidery thread through the layers at the center of each square.
I wrapped it up with some scraps of the back blue floral fabric tied in bows.
Labels:
sewing
Apr 12, 2012
I had my scheduled project for today done, but didn't ship it to its intended recipient so I am posting Hipstamatic photos I took over the weekend and will share the a fore mentioned project with you on Tuesday.
Labels:
photos
Apr 10, 2012
The winner of the leather mini wallet is my mom.
I want to thank everyone who visits my blog and gives me such nice comments on my silly projects.
Apr 5, 2012
Seedling Update
I have started all my indoor seeds and have even turned the soil in a small section of my garden and planted spinach and lots of different and colorful carrots. Here is how my pepper and tomato seedlings are looking:
These are the still pretty tiny pepper plants. I am keeping one for myself and the other two are going to live and grow at my friend's house.
The tomato plants are getting quite tall; I think it is about time they get a larger container and I can bury most of the stem. One of these guys is going to stay with me, the other is going with the two pepper plants to my friend's house.
Here is my seed starting setup. The plants live on my kitchen table with a plant light.
Reminder: Enter the blogiversary giveaway by Sunday to win a mini leather wallet!
Labels:
garden
Apr 3, 2012
Hard Baked Eggs
Friday I had a little egg decorating party. Here are some photos:
A few weeks ago I saw a link on Lifehacker for baking your hard cooked eggs instead of boiling them. I was really excited and decided that this year my eggs would be baked instead of boiled so I loaded up my oven with five dozen eggs and cooked them. Unfortunately I found out a bit too late that not all the eggs were completely cooked. The ones that are cooked are really great, but the ones that aren't are slimy and gross. Next time I will cook them at least five minutes longer.
Labels:
food,
other crafts
Subscribe to:
Posts (Atom)