I saw an excellent idea for a New Years Eve party on you are my fave: balloons filled with confetti. It will be so much fun to pop them at midnight even though I am not really having a party.
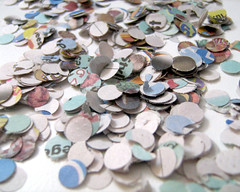
Yesterday I started making the confetti by hole punching some newspaper. My balloons will also have mystery fortunes that my crazy coworker wrote for the occasion (I am really excited to read them).
Happy New Years everyone!!!
top bar
Dec 31, 2009
Dec 29, 2009
More Hot Pads
I can finally post about these hot pads since my Grandma and Aunt have them now.
This is my second try at making pot holders and these turned out better than the last time I made some.
They are each stitched with a single heart in the center to hold the layers together. The hearts were easy to stitch and they look cute. You can see more pictures on my flickr here.
This is my second try at making pot holders and these turned out better than the last time I made some.
They are each stitched with a single heart in the center to hold the layers together. The hearts were easy to stitch and they look cute. You can see more pictures on my flickr here.
Labels:
sewing
Dec 24, 2009
Dec 22, 2009
Stitched Paper Bags
I made these cute gift bags for my coworkers. I started out trying to use up my bobbin thread, but the red and green went pretty quickly then yellow didn't really show up and pink didn't seem very christmas like (or even wintery) so I switched back to red and green. More pictures here.
They are very easy to make; here is a mini tutorial:
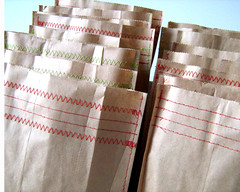
MaterialsSee, really easy to make! I think I will make more sometime down the road when I have an occasion where cute little baggies are needed.
Paper (I used brown paper bags, but any kind of paper will work)
Thread
Sewing Machine
Instructions
1. Determine size of finished bag. (Mine are 6" x 7.5")
2. Cut paper into a rectagle that is twice as wide and the same height as you would like your finished bag. (I cut 12" x 7.5" rectangles)
3. Fold piece of paper in half to mark.
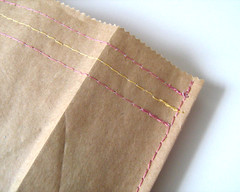
4. Unfold and decoratively stitch one or both halves of the paper.
5. Refold paper and stitch around the folded side and two of the other sides.
6. Your bag is complete and can be filled with goodies!
FYI: This will be the only post for the week since I will be traveling to Wyoming for Christmas and I didn't finish the embroidery tutorial that I had planned. Regular posting will resume next week.
Labels:
paper crafts,
sewing,
tutorials
Dec 17, 2009
More French Knots
Here is another work in progress picture of my latest embroidery project. I haven't gotten much further since Tuesday. I would like to say that it is because the french knots take a little bit of time to stitch, but it is really because I haven't spent much time on this. Slacker, I know.
Labels:
embroidery
Dec 15, 2009
French Knots
This is the start of my second project in my embroidery series. Does it look like anything yet?
Thursday = more french knots.
Labels:
embroidery
Dec 10, 2009
The Miracle Worker
On Tuesday I shared a teaser work in progress picture; here is the finished embroidery piece.
It says 'bad girl' using the American Sign Language alphabet and is an inside joke with my sister, Kari.
Explanation: When Kari and I were younger we saw The Miracle Worker, the story of Anne Sullivan and Helen Keller. The thing I remember most about the film is that Helen Keller was a brat when she was young and whenever she would misbehave (which was a lot) Anne Sullivan would spell out 'bad girl' in her hand. For some reason Kari and I started spelling 'bad girl' in each others hands. (Really we just wiggle our fingers around making fake signs because we can't sign that quickly, but we always end on an 'l'.) We probably continued doing it because it tickles a little bit and neither of us like it done to us, but it is funny doing it to the other person.
If you want to see some more pictures of this project look here on my flickr.
Labels:
embroidery
Dec 8, 2009
Sign Language Embroidery
The first post of my embroidery series is a work in progress picture.
Check back Thursday for pictures of the finished project and an explanation.
Labels:
embroidery
Dec 3, 2009
Embroidery
For the next few weeks I will be doing lots and lots of embroidery! This will give me a chance to work on my needlework skills and take my sewing machine in for a tune up.
I don't have a lot of experience with embroidery, but have done a few things. One of the projects I am planning will be stitched entirely with french knots; I am sure by the time I finish I will be pretty fantastic at doing them.
If you are interested in doing some needle work here are some embroidery resources:
The Hand Embroidery Network has a Stitch a Day series that shows how to do the new stitch and often gives examples of its use. Their library of stitches is quite impressive.
Jenny Hart of Sublime Stitching has lots of cool patterns and great instructions for beginners.
This Embroidery Flickr Pool is a great place to go for inspiration. There are so many photos from thousands of people to look through.
Labels:
embroidery
Dec 1, 2009
Alice Wrist Warmers
I briefly mentioned last week that I was participating in this loom-along from Craftzine. Well, I finished my Alice Wrist Warmers!
They look good and keep my hands toasty warm. I ended up modifying the pattern because I was unhappy with the stretch in the knit of the original pattern.
The wrist warmer on the right hand was made following the loom-along pattern and the one on the left hand is my modified version. I definitly prefer the tighter knit of the wrist warmer on the left hand.
If you are interested in making the wrist warmers with my modifications here is the sort of pattern.
Materials:
Knifty Knitter blue small round loom (24 pegs)
Approximately 100 yards bulky yarn
Instructions: (links are videos from the Purling Sprite and Kelly Jones)
1. Cast on using the e-wrap cast on method.
2. Eight rows of K1P1 Loom Instructions: knit purl.
3. Knit all stitches for 20 rows.
4. For the thumb hole you will knit back and forth. Start by going in the backwards direction (counter-clockwise, if you loom knit clockwise). First knit peg 24 and 23 together. Then knit pegs 22 through 3 individually. Next knit pegs 1 and 2 together.
5. Knit two more rows and add a stitch on to peg 1 at the end. Continue to knit one more row and add a stitch on to peg 24.
6. Start knitting in the round once again for 12 rows.
7. Bind off, make the second one, then wear and enjoy!
Note: I used the crochet bind off and it is a little snug. If you need a much stretchier bind off (so your fingers aren't constrained) try a super-stretchy bind off.1. Cast on using the e-wrap cast on method.
2. Eight rows of K1P1 Loom Instructions: knit purl.
3. Knit all stitches for 20 rows.
4. For the thumb hole you will knit back and forth. Start by going in the backwards direction (counter-clockwise, if you loom knit clockwise). First knit peg 24 and 23 together. Then knit pegs 22 through 3 individually. Next knit pegs 1 and 2 together.
5. Knit two more rows and add a stitch on to peg 1 at the end. Continue to knit one more row and add a stitch on to peg 24.
6. Start knitting in the round once again for 12 rows.
7. Bind off, make the second one, then wear and enjoy!
Update: I closed comments because I was getting way too much spam!
Subscribe to:
Posts (Atom)