
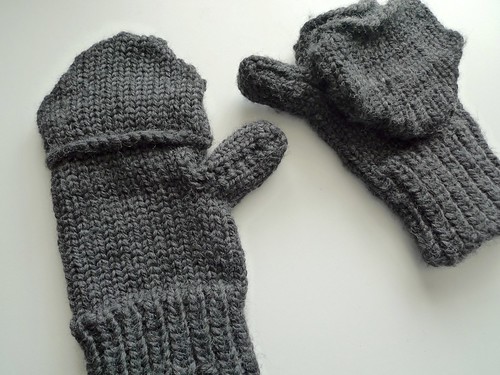
Materials:
Knifty Knitter red round loom (31 pegs)
Approximately 150 yards super bulky yarn (I used Lion Brand Wool-Ease Thick & Quick)
Instructions:
Main Mitten Body
1. Cast on using your method of choice.
2. Rounds 1 - 14: *k1,p1 ; rep from * until one peg remains, k last peg.
3. Rounds 15 - 28: knit all pegs using a flat stitch (fs).
4. To make the thumb: fs pegs 1-6 (30 rows).
5. Rounds 29 - 39: fs all pegs.
6. Divide pegs in half, place markers/tape (one side will have an extra peg).
7. For each side:
Row 40: decrease first and last pegs, fs all pegs.
Row 41: fs all pegs.
Row 42: repeat row 40.
Row 43: repeat row 41.
Bind off, then repeat on other half.
Flip Top
1. Divide pegs in half as above.
2. For each side:
Cast on center 5 pegs on one side/center 6 pegs on the other
Row 1: fs all pegs.
Row 2: increase one stitch on each end, fs all pegs.
Row 3: repeat rows 1 & 2 until first half has stitches on all pegs.
Repeat on other half.
3. Row 12 - 24: fs all pegs.
4. Bind off.
Finishing:
1. Stitch sides of thumbs, sides of mittens, and tops of flip tops.
2. Attach flip top to back of mitten.
3. Enjoy!
My hubby wants these but with the thumb that can be exposed also. He is an electrician and wants them for work.
ReplyDeleteTo make it so the thumbs can be exposed I suggest either:
Delete1) making just a hole to slip the thumb through by knitting approximately 12/18 stitches for the thumb (right/left hand), casting off, casting on again, and finish knitting the pattern or
2) making a small flap by following the basic instructions above, but knitting a row or two extra on the long side of the thumb. When stitching the sides of the thumb slightly overlap the cast off/on pieces.
You may have to do a bit of experimenting to get the cast off in the right spot so it is comfortable to use.
Thanks for sharing this pattern. I used the blue kk loom and a ww yarn and I love the fit for me. Thanks again for sharing.
ReplyDeleteExcellent! I'm glad you like it!
DeleteDo we really need the 31 peg loom to make the mittens? Did you mean the smaller size loom?
ReplyDeleteYes, the 31 peg loom. Most of the mittens are knit with a flat stitch which will make them much smaller than the loom.
DeleteI'm trying to knit a pair of these for my wife. Is this pattern using the round loom completely or knitting a flat panel on the round loom?
ReplyDeleteBoth. The main part of the glove is knit in the round, the flap is knit in the round then switches to flat panels for the decreases.
DeleteAny chance you have a video tutorial for this?!
ReplyDeleteI only have the written pattern, no video.
DeleteWhen you do step 7, do you complete steps 40-43 on one side then do the other side, or do you do step 40 on one side then the other then step 42 on one side then the other...I hope that question makes sense!
ReplyDeleteYou'll do rows 40-43 on one side and bind off. Then you'll start the yarn on the other side and do rows 40-43 again and bind off again.
DeleteGood luck!
Thank you!
ReplyDeleteOk, so I'm to the point where I've done rows 40-43 on the first side and I've done the bind off. But I'm left with the last stitch. Do I completely bind that side off? Unattached the thread and everything? Or do I move that last remaining stitch to the next side?? So sorry for all the questions! But I really appreciate all of your help!
Ok I'm thinking I understand that I need to completely bind off this first side. It how exactly do I start the yarn on the other side??
DeleteYes, completely bind off the first side. To start the other side, leave a bit of a yarn tail that you will weave in later and just start stitching.
DeleteWould you consider making a video for YouTube or something I'm more of a visual learner.
ReplyDeleteSorry, I don’t have video capabilities.
DeleteWill size 4 med yarn work for this pattern?
ReplyDeleteI think the gloves will be small with that size yarn. You should do a swatch to see if the gauge will fit. If it’s small maybe double up the yarn for the pattern.
DeleteKindly explain re step 4 for the main body. I don't get how to make that part
ReplyDeleteKnit pegs 1-6 using a flat stitch for 30 rows (back and forth).
DeleteMy six year old nephew wants me to make him a pair. Would you suggest using the 24 peg round loom and how many rows would you suggest as well?
ReplyDeleteThe 24 peg loom should work. I would probably start with half the rows overall and adjust if needed.
ReplyDeleteDo you have a video on how to make these. What's fs mean
ReplyDeleteIs there a video for this? What's fs
ReplyDeleteNo video, just the written pattern.
DeleteFS means Flat Stitch, a knit stitch without wrapping the peg.
NEED HELP!
ReplyDeleteI'm on step 7 on this flip top mitten.
In step 7 I understand I do one side...but then it says "bind off then repeat on other half "...DOES THAT MEAN I CUT YARN TO BIND OFF THEN TIE BACK ON TO DO OTHER HALF?
Then is Flip Top done on same loom after removing mitten after step 7? Then later I attach flip top?
_____
Main Mitten Body
1. Cast on using your method of choice.
2. Rounds 1 - 14: *k1,p1 ; rep from * until one peg remains, k last peg.
3. Rounds 15 - 28: knit all pegs using a flat stitch (fs).
4. To make the thumb: fs pegs 1-6 (30 rows).
5. Rounds 29 - 39: fs all pegs.
6. Divide pegs in half, place markers/tape (one side will have an extra peg).
7. For each side:
Row 40: decrease first and last pegs, fs all pegs.
Row 41: fs all pegs.
Row 42: repeat row 40.
Row 43: repeat row 41.
Bind off, then repeat on other half.
Flip Top
1. Divide pegs in half as above.
2. For each side:
Cast on center 5 pegs on one side/center 6 pegs on the other
Row 1: fs all pegs.
Row 2: increase one stitch on each end, fs all pegs.
Row 3: repeat rows 1 & 2 until first half has stitches on all pegs.
Repeat on other half.
3. Row 12 - 24: fs all pegs.
4. Bind off.
Finishing:
1. Stitch sides of thumbs, sides of mittens, and tops of flip tops.
2. Attach flip top to back of mitten.
3. Enjoy!
Yep, cut the yarn to bind off then tie it back on to the other side to finish the main body. The flip top is knit on the same loom so once you are finished knitting the main body, bind off then start knitting the flip top on the empty loom. The flip top will be sewn to the back of the main body of the mitten once you are finished knitting both parts.
Delete